Journey To The Crafty World

#Post Title #Post Title #Post Title
Showing posts with label Practice. Show all posts

Practice On Sewing A Cloth Diaper

Hi my lovely readers, i have been hibernating for the past weeks. Well, you know, due to my pregnancy ;) hehe and due to my wrists condition. If my wrists worsen, i stop doing sewing and just rest.

This week's post, i wanted to show you a simple tutorial for making a pocket cloth diaper. Hmm, why in the world i wanted to use a cloth diaper for my baby? Lots and lots disposable diaper brands now at the market, ranging from affordable to expensive. Available from newborn size to xxl size. More easy, no fuzz, no mess and no cleaning.

It happened when my MIL called and informed that she wanted to buy all the supplies for my baby, such as clothes, cotton balls, etc etc and etc. Then, cloth diapers came to our conversation. She mentioned about needing 2 dozens of cloth diapers. At that time i was not thinking anything and kinda blur. So i just go for it. I believe she is more experience than me, the FTM.

Then, i started to do some research the pros and cons both cloth diaper and disposable. There are lots of opinions, arguments, suggestions from experts to experienced moms. Basically, it all depends on you and your partner wether or not you decided to cloth diaper or simply use disposable.

The number 1 pro on cloth diapering of course money wise. You can save tons of money compare to disposable. But, there always the cons: more mess and more cleaning. Newborn tends to wet like 10-12 times daily, not mentioning poo. I have to change diaper 10-12 times, more if the baby poop. Means, i need at least 2 dozen supplies of cloth diapers (as per MIL's suggested).

Meanwhile, using disposable diaper, even though the cost is more expensive, but at least no mess, and less cleaning. The only thing that concern me is the diaper rash. I have read, using disposable diapers to baby's sensitive skin, especially newborn tend to get diaper rash. This is due to chemical substance on the diaper. However, when using cloth diaper, this rash tends to less be a problem.

I still not deciding if i want to cloth diapering or using disposable for my baby later. Me and hubby still discussing about them. we'll see about that later ;)

Okay, i have been googling on making cloth diaper and surprise, cause there are lots of free patterns on the internet. Most of patterns look very complicated, with lots of snaps or as simple as velcro closure. I just have to try to make 1. Very challenging but fun :)

The pattern i am using is from Rita's Rump Pocket diaper. And it's free :) here is the link to her pattern and tutorial:

Her instruction and pattern is very straight forward and simple to follow. I love her already.

The materials needed also not hard to find. Flannel, fleece, terry cotton and for the inserts, old kitchen towels, microfiber cloths are good to go. Fantastic!

Let's Make Them.

Print the pattern and follow the instruction to tape all the pieces together.

For inner layer i am using fleece fabric. I got from Spotlight and on 50% discount, around $4 something. Comes in pre-cut.
Outer layer, i only use solid yellow cotton poplin. I can't find PUL fabric in Singapore. Have to order online and become costly due to shipping cost.

Trace the pattern onto both outer and inner fabrics. The pattern not yet include seams allowance, so don't forget to include the allowance, i am using 1cm allowance. And marks the elastic points onto your fabrics.

For the back pocket i added another 3cm seams. I am intending to add elastic to the back pocket. 

Snip off for the back pocket. You may want to serge the back pocket sides, to prevent fray. Or you can use zig zag stitch.

Fold the fabric following the seams line. Press with iron.

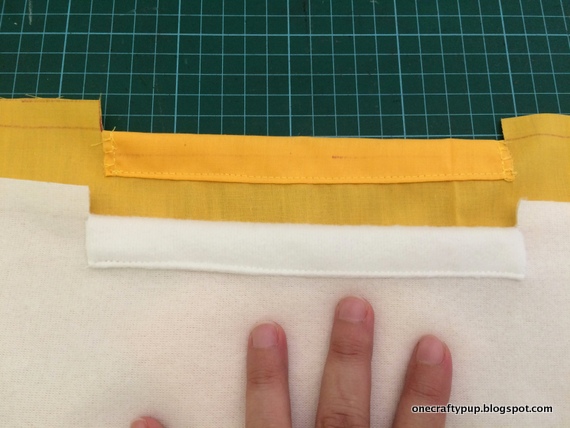
Then fold it again, so no raw edges visible. Then stitch close to the edge. Do it on both fabrics.

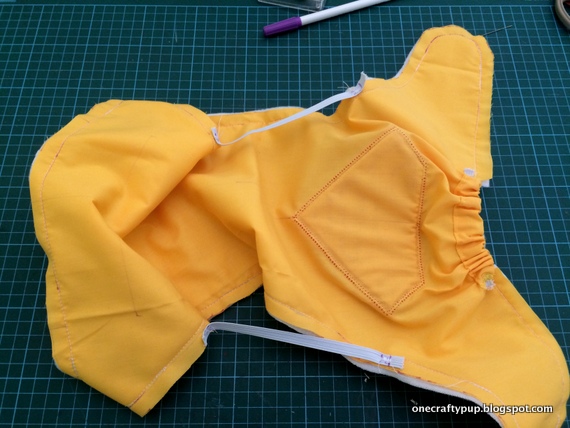
Hehe, i like to add something to make my cloth diaper more stand out. I made a superman logo from felt. First, i traced the logo from internet. Cut it then transfer it to red colour felt. Then stitch the red felt on top of yellow felt using whip stitch. voila, you got a cute superman logo.

Positioned the applique in the middle of outer fabric. Use pins to hold together. Then stitch all the way using decorative stitches available on your sewing machine. I am using zig zag stitch. just go slowly around the corners. 

Both fabrics right side togethers. Pins as many as you want. You will sew from 1 side of the back pocket to the other side of back pocket. You won't need to leave a gap for turning as your back pocket already act as you turning gap. Go slowly when sewing around the curves.

 Done, done, done.

Time to add the elastics. Take the elastic, i usually add 1cm on both sides to for easy sewing and add the marks, following the pattern. Then you fold the elastic into half then cut. You will do also for the back pocket.

2 elastics for leg gussets, and 2 elastic for back pockets.

Then sew the elastic to each leg gussets.

Closer look on elastic sewn to the back pocket. Do the same on the fleece.

Snip off fabrics around curves to reduce bulk, and you are ready for turning then top stitching.

This is how the diaper look like after turning and top stitching. But, oups, i forgot to take photos on how you suppose to stitch around the leg gussets (sorry). It's a bit complicated, and i made mistakes the first time and ended up taking off the stitches then redo @_@

When your top stitching come near the beginning of the leg gusset or the beginning of your elastic (you either feel by touching it. you should be able to feel it between layers of fabrics with your finger), you have to stitch down around 1cm to make a casing for the elastic. You can't sew the elastic or the ruffled in the leg gussets will not perform and you don't want that. Once you stitch down 1cm to create the casing, you have to pull the elastic in order to flatten the layers of fabrics. I use pins to hold down the elastic. You have to do this until you reach the end of the elastic, then once you reach at the end of the elastic, you sew up 1cm to close the casing then continue to do top stitching close to the edge. You will have to do this steps on both leg gussets.

Sorry if this steps sound very complicated, but trust me, once you get a hang of it, it will be simple. I will show you this step with pictures on my next cloth diaper tutorial.

 Back pocket opening for the inserts.

And you are finish!!

This is how you want to fold the diaper.


1. Lay flat on the surface.

2. Fold the wings.

 3. Fold to meet the top.

4. Cross the long wings to close the diaper.

The tutorial mention using diaper pins or diaper safety clips.

I have not add any snaps nor using diaper pins. I ordered snaps from QOO10.SG, and hopefully next week i can add snaps to my diaper. So, this project still in progress. Stay tuned :)

I really enjoyed making this cloth diaper. It was challenging yet fun. I felt so happy after finish sewing. Yay, i can make a cloth diaper!!!

Hope you enjoy reading my post. See you on my next post.
[ Read More ]

Let's Make A Bear Plushie From A Man's Shirt

Hi, my lovely readers, i am back!!! i hope you all in good health.

Long story short why i have been MIA (Again), i am pregnant!! Yay!!! It has been 18 weeks and counting ^_^

I was hibernating during my 1st trimester due to morning sickness (DUH!!). The term "morning sickness" really out of context, cause it can happen at any time; morning, noon, evening and even in the middle of the night. Anyway, i was glad that i can take some time off just to relax and enjoy my first ever pregnancy.

I am going to share my ultrasound photos in my other post, cause today, i want to share a tutorial on making a bear plushie from a shirt. A man's shirt exactly and my hubby's old work shirt. However, you can use any kind of material, polar fleece, quilting cotton, minky dots, any kinds of fabrics, even felt. The possibility is endless.

After searching many tutorials, ideas on the internet, i came up with my own pattern. Started with some drawings, then transfer it into my favourite software, illustrator cs6 and maybe couple of hours creating digital pattern, then finally the pattern is ready to be tested.

I hope you'll like it and enjoy making it. Since this is my first time on sharing a digital pattern, please leave any comments for my improvement.

Important Note: The pattern is free. You can to pin it to pinterest. Share it to your blog. However, please do not re-sell the pattern and claim it as yours.

Let's Make Them!


Above is the finished bear plushie. The size is about 25cm in height. The bunny i made for practice purposes. No pattern use.


Let's take a photo with OneCraftyPup's mascot, Harley.


Materials needed for this projects:
  • Old shirt or any kind of fabrics. Mine using hubby's old shirt he used to wore for work. Made from cotton & polyester in grey and blue stripes.
  • scrap felt in colors: red for the heart embellishment, black for 1 set of eyes (you can use safety eyes or black beads) and charcoal grey for the bear's snout, if you like or you can omit the snout.
  • Matching embroidery thread: red, black and charcoal grey. Alternatively, you can sew with sewing machine using zigzag stitch.
  • The bear pattern. You can download the pattern from here:  https://drive.google.com/file/d/0B0A0zCjZAv1cbDRDMk1LdXNGcFE/view?usp=sharing
  • Scissor.
  • Coordinating sewing thread.
  • Erasable marker.
  • Fabric glue (optional).
  • Stuffing/filling.
  • 1-2 hour of your time.
Sewing Technique: Straight stitch, sewing curve lines and hand sewing using ladder stitch.


Print out the pattern. You will need 2 papers. Better to use recycle paper. Yay, save paper!
Then what i do is fold the line from upper body pattern in order to match the bottom body. 


Don't forget to add your seam allowance. Mine is 1cm.


Cut out the pattern and the heart. If you feel the pattern will make a small plushie, you can photocopy the cut out and enlarge it another 50% larger. 


Cut black felt for 1 set of eyes and 1 for bear's nose. I don't include bear's snout in the pattern. It's totally optional. Then using black embroidery floss i hand stitched the mouth and add some dots. Cut 1 heart from red felt.


Trace the pattern to fabric. You may want to iron the fabric first to eliminate any creases.


Cut 2 for front and back.


Position all the embellishments and if your are happy you can stitch all the felts by hand with running stitch or sewing machine using zigzag stitch. Since my right hand is suffering from carpal tunnel syndrome due to my pregnancy, i just glued them using fabric glue.


Place right sides together (front fabric + back fabric) and pins. Don't forget to mark the opening. mine is at left leg.


Sew slowly due to many curves. Remove pins along the way.


Almost done.


Snip corners and curves, but not too close to the stitches.


Flip inside out through the opening.


Let's fill the bear with stuffing. I am using dakron (Indonesian) or polyester filling. You also can fill it using scraps fabrics.


Once the bear cuddly enough, you may want to shut the opening using ladder stitch.


Enjoy your hard work!!


Yay, we are finish. See you on my next projects.

[ Read More ]

My First Hand Embroidery Project

Hi my lovely readers ^_^ 

This week i would to share my first ever hand embroidery experience. At first i thought it would be very difficult, but as i try it is not that difficult as long as you keep the stitches the same length and no hurry, just take it slow. It's quite fun ^_^

I have prepare the image that i want to use for this project. It is from my hand drawing, a simple dolphin.

I am adding 4 swirls for decoration.

As for the fabric, i am using linen in natural colour. You may use cotton or aida cloth as well. 

To transfer the image onto fabric, i am using iron on transfer pencil from clover. I did some researches on internet before using it. Many people suggesting traced and draw the outline with tissue paper or other this paper. I did tried using ordinary paper, it just not do the job very well. The heat setting on the iron also must match with the type of fabric you will be using. Preferable don't use the steam. Since mine is linen, so i am setting the iron temperature to cotton/linen.

1 important tips to remember: the iron on transfer pencil once it is transfer onto fabric, it will become permanent. Therefore, make sure trace and transfer the images in he right position. If you want to transfer words, do not forget to reverse them first.

Since i was using ordinary paper to transfer the image the line quite blurry and hardly visible, therefore i am tracing the lines again using erasable fabric marker.

Oh, i prefer do the embroidery with embroidery hoop. Just remember to pull the fabric really tight. The fabric must be taut, it would make your job easier. I did try not to use the hoop though, it just won't work with my linen.

For this simple project, i am using:
-) Back stitch for the outline body of the dolphin.
-) Chain stitch for the 4 swirls.
-) Satin stitch for fill in the eye and cheek.

I am quite nervous to begin the first stitch ^_^ just remember to keep all the stitches the same length. The embroidery floss is rose colour.

Yeah, finally finish the body of the dolphin. Now, time to add in the details like its eye and pinky cheek.

Eye and pinky cheek done!!! Use satin stitch for filling cheek and eye.

Let's add some decorations using chain stitch. 1 done, 3 more to go.

Done done done. Carefully open the embroidery hoop and take put the fabric. It will full of wrinkles. it will need a very good press on hot iron. I usually put my old t-shirt on top of the fabric to prevent any burning. Give it 2-3 times press on hot iron, the fabric will free from all wrinkles.

Ta-da, i made it into zippered pouch.

Gold teeth colour zipper from YKK brand.

Inside is red polkadot cotton for lining. I love polkadot fabrics.

I hope you enjoy reading my blog as i am enjoying writing and sharing my experience on hand embroidery.

There are lots of tutorials on how do simple hand embroidery stitches on the internet and youtube has tons on videos.

I will see you on my next project ^_^

Let's Make Them!!
[ Read More ]