Journey To The Crafty World

#Post Title #Post Title #Post Title

Fabric Covered Button Earrings

Hi, friends ^_^

I always want to try to make a pair of fabric covered button earring. They are cute and simple. You can mix and match with your wardrobe. 

This is the result.
(Sorry for the blurry photo)
 

Gather all the material:
 I'm using the tool from Daiso. Very cheap, for S$2 you will get the tools, the circle pattern and 15 metal buttons, the finish button will measure 22mm. A strong glue, i'm using E6000. Erasable laundry marker, to draw the circle to your fabric. 2 Scrap fabrics. 2.5cm Circle plate and 2 ear hooks (i don't have flat back ear studs, if you have, you can use them). Another tips: you may want to use circle plate bigger in diameter than your finish button. My button finish at 22mm, therefore i'm using 2.5cm circle plate. And last is scissor to cut out the patterns.

I took out the package. Inside there is 1 button mold with clear color. 1 Red pusher. 1 Card circle template. And 15 metal buttons plus their loop buttons back.

1st: With round-nose plier, carefully take out the button loop. We need a flat back. If your button already have flat back, kindly skip this step.

2nd: With the circle template traced it onto your scrap fabric with erasable laundry marker. Then cut. To make a pair of earring, you will need 2 circles.
(Again, sorry for the blurry photo)

3rd: Push fabric to button mold. The printed side should be face down on top of button mold. Then place button upside down on top of fabric circle.


 You can see through from button mold to see if the printed place nicely like the way you want to.


4th: Place the red pusher on top of fabric and button. Push until you hear "click" sound.

 Gently release the fabric button from the mold. Almost done.

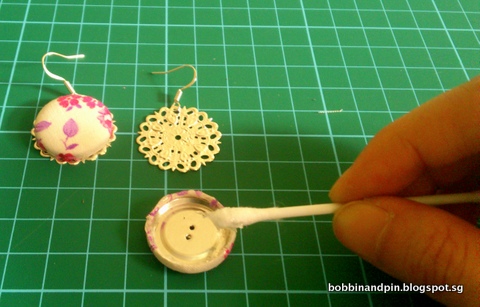
5th: Using a cotton bud or toothpick spread thin layer of E6000 glue (or you can use any type of strong glue). And place button on top of the earring plate (or again if you have flat back ear studs). Let the glue dry. You are finish.

I like the result, and i think i will make more. Hope you enjoy.

Feel free to give comments for my tutorials. I's love to receive more info and knowledge.

Let's Make Them.
[ Read More ]

Daiso's Quilt Batting

Hi Friends,

Last week i went to Daiso at Plaza Singapura. I was looking for fabric button maker then found Quilt Batting. Hmm, i tempted to buy cause i just came from Spotlight, they also sell quilt batting, but very expensive. Of course the quality can not be compared, Spotlight's products mostly imported from Australia and US, and Daiso's are from China. But i always looked for cheaper alternatives at Daiso. They sell quite a lot of crafts and sewing supplies. All products are S$2.

I decided to walked around the shop first while think hard; Do i need quilt batting? But what am i going to do with batting? I never quilt and never intend to. However the S$2 really really tempted me.

Since i addicted on making clutch purses and fusible fleeces are nowhere to be found (Spotlight has, but very very expensive. More than S$10/meter as i recalled), i grabbed 1 pack of Daiso's Quilt Batting. Very excited.

Okay it mentioned on the package "Quilt batting with inner liner type. This is hard to get wrinkled because of inter liner." (Interesting). Size approx: 75x80cm. Thickness approx: 5mm. For quilting and patchwork.

 Behind the package is the instruction on how to use the batting. Basically you just sandwich your outer fabric and lining fabric then sew on.

Okay, i can't wait to try the batting on my next project. Hopefully i can get it right. Please if you have any info where to buy not so expensive fusible fleece in Singapore, keep me inform. I had tried went to Textile Centre but no luck. So far, only Spotlight has them, but so expensive.

See you on my next projects.

Let's Make Them.
[ Read More ]

Easy Fabric Clutch Purse


Fabric Clutch Purse.

Hi Friends,

2 Weeks ago, i was browsing to search for inspiration on sewing. I had a pile of fabric scraps and no clue what to do to them. Then i found many tutorials of making fabric clutches. Mostly they used scrap fabric cause it's for hand clutches, you don't want to make it very big. Of course you can make whatever sizes you feel comfortable. You can add inner pocket or zippered pocket. My finish clutch measure at 12x25cm. It take me around 4 hours to complete (My first 1 hour was to chose the fabrics) and great for beginner sewer (Like me!).

What you need for this project:
  • 1 Outer fabric 27x32cm. Mine is the black cotton with red roses print.
  • 1 Inner fabric 27x32cm. I used bright blue.
  • 1 Inner fabric 15x22cm for inner pocket.
  • 2 Fusible Interfacing. Cut each 27x32cm.
  • 1 Cotton batting 27x32cm. This time i get a chance to test Daiso's Quilt Batting.
  • 1 Set Magnetic clasp.
  • Sewing Machine with the matching thread.
  • Scissor and tailor's chalk.

First thing you want to do is making the pattern. You can use newspapers, pages from magazine, cereal boxes. Anything you can write/draw on. After that trace your pattern onto your fabrics, interfacing and batting. Oh, before forgot, my seams allowances are always 1cm (easier for me rather than 1/4 inch). Then cut, cut and cut until you have 1pc of outer fabric, 1pc of inner fabric and 1pc inner fabric for inner pocket, 2pcs fusible interfacing and 1pc batting.

Fused interfacing to wrong side of fabrics (Glue side facing down) using correct temperature setting for your fabrics. Press down and hold for few seconds. After that let cool around 20-30 minutes.

While waiting we can make the inner pocket. My usual inner pocket measure 8cm in length & 16cm in width. The reason i ask you to cut 15cm in length & 22cm in width is that we need to fold 2 times at 1cm at each left & right side. For the bottom, you also need to fold 2 times at 1cm. For the upper part fold 2 times at 2cm. Then you must iron flat all the folds.   

Using straight stitches, hemmed the upper part. You also can hemmed all the 3 fold parts.

After interfacing cooled down, time to place the pocket onto inner fabric. From top inner fabric to upper pocket is 10.5cm and 4.5cm for left and right. I positioned the pocket right at the middle. 

Sew all the 3 parts. Leaving the top part open. You can sew using straight stich, but zigzag stich can add a nice touch too.


Now, attaching the magnetic clasp. Personally i am still having a difficulty on positioning the clasp. I never get it right. Sometimes i prefer button closure. You need to positioning 1 clasp at the inner fabric and the other 1 at the outer fabric. I measure 3cm from the top, then draw a circle following the size of the clasp, not forgetting draw 2 lines for the prongs. You can draw using tailor's chalk or invisible gel marker. After you feel confident, cut along the 2 lines of the prongs using small sharp scissor. Turn the fabric. Insert the metal plate then bent over the 2 prongs.


Attaching the other magnetic clasp onto outer fabric. Placed together wrong side of inner fabric and outer fabric. Then fold. You can fold to whatever size you feel comfortable and the fold will determine the length of your clutch. Mine is 11cm. Then again i will repeat the process on attaching the clasp. I measure 3.5cm from top part of outer fabric. Draw circle with 2 lines of prongs. Cut the line using small sharp scissor. Turn, unfold the fabric. Insert metal plate and bent the prongs. 

Place: batting (Daiso's quilt batting has inner liner. I place the inner liner face up. Soft part face to wrong side outer fabric), outer fabric and inner fabric right side together. Pinned. The sew all 4 parts, but don't forget to leave 10cm opening for turning.

Clip the 4 corners to reduce any bulks. Watch out for the seams.


Carefully turning fabric inside out. Press down flat using your hand or iron.

Turn the fabric. 


Sewed the bottom part then fold 11cm.

Start to sew the rest of the 3 parts. When sewed the top part, you also sewing the 10cm opening.

Ta-da. Finish!

Back view.

Enough to put Handphone, keys, cards, money, lipbalm, and any small but essential things.

That's all from me. I hope you like it and enjoy. As usual please give me any comments thru email at c3cillia@gmail.com. I am open to any comments, suggestion and opinions.

See you in the next tutorial.

Let's Make Them.
[ Read More ]

Daiso's Placemat Tote Bag Tutorial

Hi All!!!

Oups, i've been MIA again. Sorry sorry. Me and hubby were busy do spring cleaning for Chinese New Year. Everyday busy sorting old things and make crucial decision: keep or throw. Mostly we throw. Stared from our own bedroom, living room, dining area, kitchen, then follow by my Sis in law's room (used to be her room). Since she moved back to Jakarta to be with her hubby, her room were full with our rare-used furniture and other stuffs. We have been avoiding to tidy up her room ^_^ . But, uh-oh due to CNY, we have to. Lastly was my workshop room. Lucky i always tidy up after finishing any kind of projects, so it was not too much of work.

Now, time for little bit story about the tutorial. One day, i search on projects/ideas for simple, easy, and cheap clutches, and chrome gave me placemat clucth's tutorials. I was amazed by the people's creativity. I never thought a placemat can be turned into lovely cluthes and even tote bags. You can go and search at www.tipjunkie.comwww.favecrafts.com and many more.  Many good tutorials listed there.

Honestly, i never use any placemat when dining after living in Singapore. My mom used to had those placemats made from plastics with cute patterns. After looking at the tutorials and images from internet, i know right away i had to try and make one. And there is only one place i could think of that sells many varieties fabric placemat, Daiso.

True! On the kitchen/dining aisle there are a lot of fabric placemats. Mat using waterproof material also can be found there. The one using bamboo also have. Lovely! My choice was tortoises patterns. The fabric color was natural/off white and the tortoise in navy blue. Love at first sight.

Okay let's begin. We need:

  • 1pc placemat of your choice (Mine i use from Daiso, size approximately 31x41cm. You can use whatever size you want.) - This will be the outer fabric (I'm using 2 different fabrics, for the back i'm using plain calico with matching color (of course you can choose same fabric or different colors - be creative ^^ )
  • 2pcs 31x41cm fabric for inner lining (Any colors you prefer. Mine is beige cotton poplin.)
  • 2pcs 62cm long cotton webbing for straps (Again, you can choose to make 1 or just use the ready use type.)
  • Matching color thread, scissor, ruler, seam ripper and fray stop.
  • 1 hour of your spare time.

 I bought 2 placemats. I'm thinking 1 for making tote bag and the other 1 clutch purse.

Lay the placemat on the flat table. I noticed the seams too bulky for my machine, therefore i open all 4  seams using seam ripper. If your machine can handle bulky seams go ahead skip this step. Or you can cut the bulky parts to whatever size you want.

 Calico and placemat right side together. Then sew the 3 sides using straight stich with 1cm seams allowance but leave 2cm on the top side open. You will have to do the same with the lining. I'm using binder clips instead of pins.

 Turn the fabric. You can press flat using hot iron. For the lining no need to turn.

 Position the edge of the straps 7cm from each side of the top bag. Then sew or basted 1cm seam allowances. You might want to dab little bit of fray stop at the edge of each straps to prevent fraying - This is optional.

 Tuck the outer fabric inside the lining. Right sides facing each other. Pins the top. Make sure the side seams all matched nicely. Then you will need sew the top 2cm seams allowance, straight stich. Don't forget to leave 10cm opening for turning.

 Slowly pull the outer fabric out from the 10cm opening. If you want, you can cut the corner on the lining (Don't cut the seams). Then tuck the lining inside the outer fabric. You can iron the bag to make it tidy. Lastly, top stich the top side, all around to close up the opening.


Ta-da, your bag now is ready to be use and show-off (Hehe).
Currently, i'm using this tote bag. I use it to carry books, put my purse, smartphone and everything inside. I bring this tote when going back Jakarta. Love this tote. Enjoy!

 Okay, Harley wants me to take his photo together with my new tote bag.

Thank you so much for visiting my blog and reading my tutorials. I'm not expert on sewing yet, i'm just a self-taught sewer. If you have any comments or opinions please don't hesitate to mention on "leave a comment" box below. I hope hearing from you soon.

Let's Make Them.
[ Read More ]

Denim Foldover Clutch Purse Tutorial

Denim Foldover Clutch Purse Tutorial

Hi Lovelies ^_^, it's me again sharing new tutorial.

I always been afraid of sewing a zipper, therefore my bags, totes, clutches seldom use any zippers. Normally i will use tiny strings or magnetic snaps for closure. But, i had conquer my fear (YES!!!). Last week, i spent my weekends to practiced sewing a zipper into a small foldover purse. I used scrap fabrics from previous projects, sewed the zipper using a zippered foot that came from my sewing machine, add in beautiful lace, pinned it with my fabric rosette brooch and done. I like the end result of the purse. However the sewing result....Hmm, i need to practice more ^_^.

For this projects, you will need:

  • 8 inch normal zipper - Mine in hot pink.
  • 2 pcs 20cm X 32cm fabric - I used the scrap denim material from previous projects.
  • 20cm Lace or ribbon - Any colors of your choice.
  • A zippered tooth - your sewing machine should came with this type of foot, if not check with your local dealer or you can purchase a universal zippered foot.
  • Scissor, matching/contrasting thread, ruler.
  • Pretty embellishment of your choice - i'm loyal with my fabric rosette brooch.
  • 30 minutes to 1 hour of your weekend time.
Oh by the way, this project was my last time using Bother BM-2600. Yup, i'm changing new sewing machine. After 3 years sewed with Brother, i felt like it did not give me much results that i needed. I need to sewed many layers of fabrics in one passage, but sadly my Brother did not deliver good results. Sadly, it is her time to retire. 

Gather the materials. Sorry for the low quality of pictures (I'm using my smartphone and use only natural afternoon sunlight). The denim color is dark blue. My friends thought it was black and even brown.

Place the zipper upside down to wrong side of the fabric and pin. You see at two end of the zipper, there are extra length of 1cm each side, this is for seam allowance. Take your time to sew slowly using a zippered foot. After finish at 1 side, you will do the same for the other side.

This is my zipper teeth that come with my sewing machine. As you can see, there is 2 small rectangles, left and right. When you sew at right side of the fabric you attach the left bar to your presser feet. You will do in reverse when you sew the left side of the fabric.


Open the seams. You can iron to make it nice and flat.

Now again using the zipper foot you will have to sew both right side of the fabric. You can use matching thread or contrasting thread to create different look. I finish the right side and turn to left side. I'm switching the zipper foot from left bar to right bar in order to sew the left side of the fabric. The edge of the foot will help you locating where is the zipper teeth and also preventing you from getting too close to the zipper teeth.


I learn this method while i was sewing. You can not sewing with zipper head in front of zipper foot. The head will create uneven straight line. This is how you have to do:

Bring your needle down to fabric. Lift up the presser foot.

Pull the zipper head away from the zipper foot to the area which you had sewn earlier. You do not want to sew around the zipper head. After that you can continue to sew.

This is how it looks. I'm using navy blue thread. Not too bad for first timer ya (Hehe shy mode on).

 Before sewing the lace, i like to position it to see how it will look after finish. I place it 3cm above the zipper.

Sew upper and below lace to fabric. I use the edge of my foot as guidance.

Turn the fabric, right side facing each other. Pin the 3 sides. Open the zipper half way (Do not forget this step, otherwise you may not able to turn the fabric inside out). Sew the 3 sides.

 Trim the excess fabrics, specially at the 2 corners. I did not use lining for this projects, cause my intention is to practice sewing a zipper.

Turn the fabric inside out through the open zipper. Poke the 2 corners using your finger. You can press with iron.


You are now finish.

 Closer look.

 I embellish with my fabric rosette brooch.

Thank you so much for visiting my blog and read my tutorial. It has been fun to share my knowledge with all of you. Please, if you have any comments, leave in the comment box below. I would like to hear from you. See you again in my next tutorial.
[ Read More ]