Hi my lovely readers,
WHOA!!! It's new year already and today is 02 Feb 2016. Time really flies. HAPPY NEW YEAR EVERYONE!!!!
Lots happened in 2015 in my life, both happiness and tragedy. Hopefully in year 2016 my life would be splendid (hehe, must keep positive thinking).
Okay, i don't have much time. My baby is taking morning nap. He usually naps around 10am and lasted 1-2 hour. So, let's get started.
For today's tutorial or DIY project, i wanted to share DIY Baby Rattle Toy. I have been wanting to make this toy ever since Matthew was born. And i have been eyeballing for unique shapes of plastic bottles, but i didn't find any, so when my hubby brought home empty pepsi bottle, i quickly washed it and dried it (can't wait any longer to make this toy).
I guarantee it's super quick, easy and inexpensive. I mean it, really quick, max 10 minutes ;)
let's Make Them.
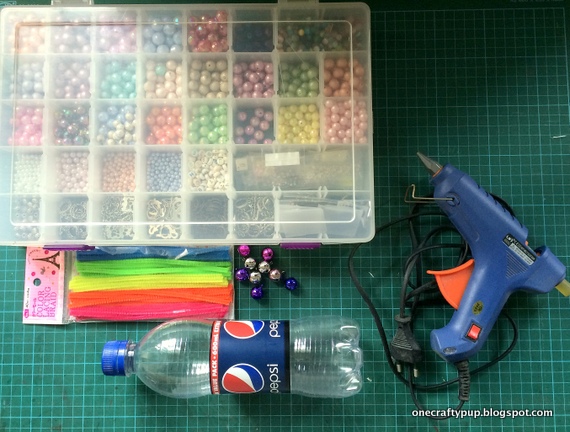
Gather all the supplies:
- Plastic bottle - I use pepsi plastic bottle. Cleaned and dried overnight. You can use any size or shapes of plastic bottle. I don't recommend glass bottle as you baby will play with it by sliding it, rolling it and even dropping it to the floor.
- Beads - Lots of colours, sizes and shapes. I use round shape beads.
- Colour lacing braid - You can skip them if you don't have. I can't remember for what purpose or project i bought them for.
- Metal bells - Again any sizes and colours.
- Glue gun - Or any strong glue to prevent your baby from opening the cap.
Take a closer look of the colour lacing braid.
Metal Bells.
Beads, beads, and beads.
Choose bold colours. According to baby experts, baby more attracted to bold and bright colours.
Add little bit of darker colours of beads and lighter colours and even gold colours to add varieties.
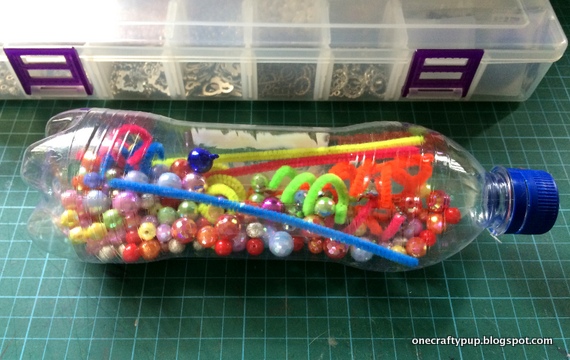
Filled the bottle but not too many. Max: half the bottle.
Mine is only quarter.
Don't forget the bells.
Let's twist some cords.
Grab 1 cord the twisted to your index finger.
You can try to twisted to your other fingers to create different sizes.
Let's make smaller twisted cords.
Twisted it to your little finger aka your pinky.
I left few cords untwisted for variations.
You may add more beads, bells, cords if you like.
Lastly: sealed the cap with hot glue gun and let it dry. It shouldn't be long.
YAY!!! It is DONE.
Tester Time: Baby Matthew just woke up from his nap. His eyes locked to his new toy.
Observing...
YES!!! I can tell he likes his toy already.
Smile my baby boy!!!
"This is mine. Go and make your own toy." He said.
Thank you for visiting and reading my tutorial. Hope you enjoy it.
Feel free to share the tutorial and pin it.
Let's Make Them.


