Hi, everyone,
How are you? Sorry for waiting quite some times to read my latest tutorial.


[ Read More ]
How are you? Sorry for waiting quite some times to read my latest tutorial.
As you all know, i am pregnant. Entering week 25 now ^_^ and i have been diagnosed with De Quervain's Disease (you may look up on the internet). It's affecting both of my wrists, right and left. But more pain for my right hand cause i am right handed. It caused me pains whenever i try to use my wrists just to do my regular courses. Yup, just about anything i do using my wrists are painful, including turning door knob, using my keys, stirring, cutting fabrics, not mentioning hand embroidery. Although, sewing with machine still okay.
My gynea booked me an appointment with orthopaedic and he was the one who told me about this unfortunate pain. This is due to my pregnancy and will get better once i had deliver my baby. Therefore in the mean time i have to restrain myself for doing much activities and have to wear custom made brace for my right hand, as for my left hand i can still wearing a wrist support.
I asked about sewing and crafting, and the doctor told me i should give it a try, but must use the brace. At least the brace keeps my wrist in steady position, not too much movement then cause frictions. We don't want that to happen. So go slowly. As long as i still can do sewing, i don't mind wearing the brace ^_^
I asked about sewing and crafting, and the doctor told me i should give it a try, but must use the brace. At least the brace keeps my wrist in steady position, not too much movement then cause frictions. We don't want that to happen. So go slowly. As long as i still can do sewing, i don't mind wearing the brace ^_^
Okay, enough about my condition, now let's get started with this tutorial. I hope you will like it. Since, i am having a baby boy, i try not to use pink fabric. But hey, who said boy can't use pink? Hahaha.
I did some research from books and internet (of course) that newborn visual sight only limited to those high contrasting colours, example black and white. And later, will develop to see a hint of red during 4 months. Therefore, you may see lots of black and white colours fabrics i used on my baby project (my zebra socks and bunny plushies).

front view

Side view.
PS: i have not name my baby boy yet. This letter "L" just simply for Lion.

Another side view.

Bottom view.
Material needed:

- 6 pieces 14x14cm of scrap fabrics.
- 16 pieces of ribbons (5cm in length folded to 2 for each ribbons).
- 1 pieces of black felt for the alphabet (you can print out the template from internet).
- 2 pairs of black safety eyes, 1 tiny scrap of black felt for nose and black thread for sewing the mouth.
- 1 piece 4x15cm of scrap fabric for the tail.
- Poly stuffing or dakron.
- 1 rattle toy (i will show how i made my rattle).
- Coordinating thread, scissor, ruler and sewing machine, pins, fabric glue (optional).
- 1-2 hours of your afternoon to make this toy.

My scrap fabrics. Cuts in squares.

The fabric i'm using for making lion's face is made from artificial fur. So soft and suitable for doll making. I only found in the remnant section in Spotlight. Cost around $2.

My rattle: 1 mini plastic jar, you can buy it from cosmetic store. Fill in with beads, seed beads and tiny bells. Not too much but also not too little. you can also try to rattle it to hear the sound. Nothing fancy ^_^

Take a closer look what is inside my rattle.

Ribbons!!

My square template. size: 14x14cm, including 1cm seams allowance on each 4 sides.

10mm black safety eyes, rivet model. I bought from Swalk88 in chinatown.

Position where you want to place the eyes, nose, lip and the ribbons. I prefer place the ribbons not too close to each corner. You might want to give a bit of space for sewing and turning. Once settle, use non permanent marker to make a dots where you want to place the eyes.

Make a tiny slit the gently push the eyes from right side of the fabric. The screw parts should be at the wrong side of the fabric.

Gently just push in the back to secure.

Flip the fabric then sew the nose and sew or glue the mouth/lip using embroidery thread with whip stitch/back stitch. The colours should be up to you. I am using black.

Pin pin and pin all ribbons to the right side of the fabrics. Remember to give a space on each corner. I drew a 1cm line on each corner for the space.

Sew all around.

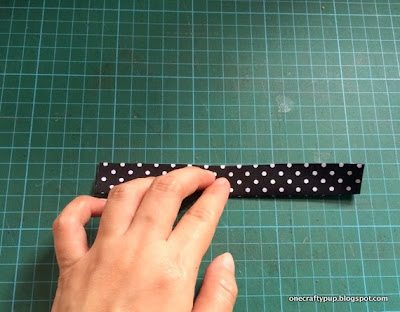
Let's make its tail. Take a scrap fabric 4x15cm. Fold 1cm on 1 end only. Iron.

Fold into 2. Iron.

Open, you can see the folding.
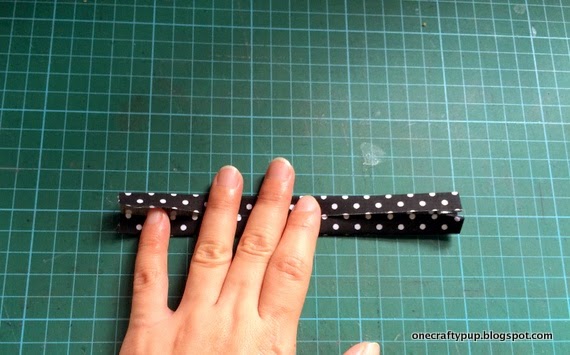
Fold each side to the middle. Iron.

Then fold again into middle. Iron.

Sew!

Tie a knot on the folded end. And you are done.

Place the tail to the middle 1 of the square fabric. I decided to use black polkadot as the back side of the cube. Then sew to secure the tail.

You can search the alphabet of your choice from google images. Then just trace it from your screen to a piece of paper, cut then transfer it to a black felt. Again, the colours is up to you.

Position the letter. I glue it to make it secure.

Slowly with zig zag stitch or any decorative stitch available on your machine just stitch around the letter.


Attention! There is an intruder coming. Hehe, Harley just want to check everything is in order for his baby brother.
Okay, back to the tutorial!!

Place A & B right side together then sew the top (where the tail is sewn). Leave on each corner 1cm open (don't sew).

Then take C place right side with B. Sew, leave 1cm on each corner.

Flip the fabric. Open all the sewn seams then iron.

Take F, right side together with C then sew with leaving 1cm open on each corner. Iron open the seam.

Flip everything. Then place D & E to B, matched the side. Remember i ask you to leave 1cm on each corner. You will start sewing from that 1cm opening. But, you will have to leave 1cm at beginning and end. Hope. this is not confusing you.

Almost there!

Now, you want to sew together C to D & E. Do 1 side each time. Just take your time.

So far so good? This is how the cube looks like after C being sewn to D & E.

Now, time for A to be sewn to D & E. Again, sew 1 side at a time. Follow my diagram. where to start and where to end.

If you follow my diagram, your cube will end up like this.

Okay, now the fun part, you will have to sew F into A, D & E. Go slowly and do each side at a time. Don't forget to leave an opening for stuffing and turning.

Yup, yup, yup!!

From the tiny opening, turn everything inside out.
Time for stuffing with dakron and throw in the rattle.

As usual, Harley do modelling for the toy.

I like this 1 better ^_^

Don't forget other toys i had made!!!!
I hope you will find this tutorial useful for your projects. I will see you in my next tutorial.
Let's Make Them!