Journey To The Crafty World

#Post Title #Post Title #Post Title

Addicted To Shrink Plastics

Hi hi my lovely readers, i would like to share my addiction (No!!!!!) not addiction to drugs or anything illegal, but my addiction to shrink plastic ^_^ I have been drawing more cartoon animals for my shrinkies projects. Yup, i called them shrinkies, cute right?

I will post few pictures of my drawing. Btw my hand drawing not yet improving. Sometimes my friends told me if my style of drawing is always big fat fat on the belly but then skinny on the tail or lower body part (hmm, i also dunno why i always drew that kind of style). Don't worry i corrected them one by one to look more balance ^_^

This is one of my hand drawing. A bunny, a mouse and a cat.

For a trial i made a bunny charm. Turned out okay and very cute.

Decided to make a phone charm. I added a pinky bell to add cuteness. It's available at my Toyoutpost locker for S$3.50.

 Let's try out the other shapes.

Darn!!! Not all pieces turned out good. The 2 mice failed :( seems like i make mistakes when colouring. Both look like dirty. But the bunny and cats look okay.

Ready for sell.

I always wanted to try bigger shape. This is Harley from my hand drawing.

The cut out piece looks cute already. Lightly coloured with brown and tan.

 Failed!! I tried using 2 shrink plastics: white and clear. The white one was burnt (look at the body, got burn marks). The clear one was crumpled so bad, you may not notice it on the picture, but the left ear was out of shape due to it sticked to the body when it heated. As for the colouring part, i like the clear better.

From many failure pieces, i am not giving up just yet. I keep on practice by making simpler shapes. Learn how to use the heat gun properly to avoid the whole piece crump into one. Practice on colouring each piece very lightly and emphasise few spots only instead on colouring the whole part. Just keep it simple.

For next projects, i want to make charms for necklaces. If this projects success, i am planning to sell them on my Etsy store and some for my Toyoutpost locker.

The theme is zoo animals. I drew animals, which can be seen at the zoo. I keep each drawing as simple as i can. Heat each piece one by one and slowly take my time, no rush. And so glad and happy they all turned up good.

From top: Tiger and funky zebra.
Below: Giraffe, elephant and polar bear.

I like how they turned out. The tiger so cute.

The polar bear piece has lots of fans. Super cute.

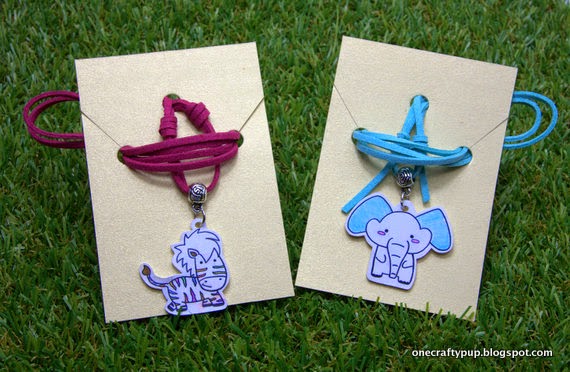
Now time to assembly each piece into pendant. I am using antique silver pendant and faux suede cord for the necklace. More colours are coming.

 Thinking on adding some sparkle, like this crystal beads. But they are not matched with the charms.

 Cute. The suede cord is adjustable. Can fit any neck size.

Here is the link to my Etsy shop: https://www.etsy.com/listing/191406096/handmade-cartoon-animals-shrink-art?ref=shop_home_active_1 It's totally customisable. You can choose the suede cord colours with the charm that you like. This is made to order. I will make a new piece base on your order.

It also come with handmade blank necklace card. You can put your personal messages at the back of the card for your special recipient for free ^_^

 Want to make a bracelet instead of necklace. I can too.

I hope you like my shrinkies. I have lots of fun on making them. Many designs coming soon and perhaps for hair clips or other accessories.

See you on my next post.

Let's Make Them.
[ Read More ]

Custom Order For Etsy

Hi my lovely readers,
On this week's post, i would like to share my fun time on making laptop sleeve for one of my Etsy buyer. She requested a custom order for making Lenovo Ideapad Yoga 13. It's a convertible PC/Tablet, super slim, super light and super nice design. It has a keyboard which you don't want to use is, just flip it over and it is convert into tablet. The display is 13.3" (bigger than my MB Pro) and runs using windows program.

Each fabrics were chose by her. I sent her photos of the fabrics. At first she wanted the pink elephant fabrics. That was going to be difficult, since i don't have enough fabrics to make 1 whole laptop sleeve. It is only enough to use for accents/decorations, such as pocket and flap. Luckily she didn't mind. I gave her few combinations: plain fabrics combine with pink elephant fabric and she agreed and picked combination of plain drill grey as the outer fabric and pink salem flower patterns as the lining. The pink elephant fabric for front pocket and flap. For closure, she agreed for using brown velcro tape.

Outer fabric: plain grey colour drill

Lovely pink salem flower pattern as lining fabric

I am going to make an envelope sleeve style for this gadget sleeve. I sent her my drawing and she agreed to it (Yay!!)


This is the result ^_^

Take a peek at the lining.

I made her a simple drawstring pouch as a thank you gift. Made using same fabric as the lining. I hope she will like it.

All neat and packed. Ready to be mail out.

 Harley posed together with the sleeve. After all he is OneCraftyPup's mascot. 

I had so much fun when designing and making this sleeve. I do hope she will like it. I can't wait for her review on my Etsy. 

Oh, the overall process will takes up to 5 days. I tried to be efficient as much as possible. 

See you on my next post.

Let's Make Them.
[ Read More ]

My Fabric Supplies

Hi my lovely readers,

Today, i would like to post photos of my fabric supplies. I know, i never do that before. Honestly, i wanted to post them from long long time ago, but, no time :'(

Okay, so below pictures are my fabrics supplies suitable for making laptops or tablets sleeves bags, because they are made from sturdy material, such canvas or drill. Some are imported from Japan and some from Australia. But they are also some made from cotton, which from my tried and tested also suitable for gadgets sleeves. All my sleeves are interfaced and padded for your gadget protection.

Please take a look ^_^

1 of 3 newest addition to my collection. Base colour: sky blue. Made from cotton canvas.

2 of 3 newest unique and very whimsical. Base colour: dark purple. Made from cotton canvas.

3 of 3 newest addition. Very cheerful elephant. Base colour: lime green. Material: cotton canvas.

 Buddy Lee doll. Base colour: navy blue. Material: cotton.

Patchwork style. Base colour: mix. Material: cotton.

Vintage Paris. Base colour: brown. Material cotton canvas.

Sewing novelties. Base colour: Cream. Material: cotton canvas.

Paisley. Base colour: cream & light brown. Material: cotton.

Sport theme. Material: drill.

Whimsical bird. Base colour cream & brown. Material: heavy weight cotton.

Classic red riding hood story. Material: cotton.

Cute animal. Material: cotton canvas.

That's all for today. More fabrics to come (i hope so) ^_^

See you in my next post.

Let's Make Them.

[ Read More ]

Is it magic? No it's just shrink plastic - A Tutorial

Hi my lovely readers,

I have been addicted with shrink plastic. In USA they called it shrinky dinks, which is also the name of the brand. However, i have no luck in finding shrinky dinks in Singapore or even Jakarta. Searched and browsed Singapore craft blogger, got few info that shrink plastic available at Bras Basah complex (Art Friend or Art Mark) and they come in different names. 

Since, i only want a piece for trial, i do remember Daiso got sell shrink plastic, but not all branches, depending on their stocks. So, i just try my luck and went to Daiso at Plaza Singapura and bravo i found it. It cost S$2 for a sheet size about A4 paper size (forgot to take picture @_@). They only have the clear/transparent sheet. 

Before we move on to the tutorial, i need to explain a bit about this type of plastic. The base material consists of thin, flexible polystyrene plastic (#6) sheets (The same material for the food container). Prior to heating, the plastic sheets can be coloured with felt-tip pens, acrylic paint, coloured pencils, etc. and cut into shapes. However, oily or waxy substances (such as cheap coloured pencils, crayons, or oil paint) are not suitable because they melt or burn in high heat. When heated with the Easy-Bake Oven, a conventional oven, or a heat gun, the plastic shrinks by about five-eighths and becomes thicker and more rigid, while retaining the coloured design. (I gathered the info from wikipedia).

I'll be using a heat gun instead of using oven. If you want to use oven, better buy another small and cheap oven for your craft usage and do not mix with the oven you use for food (this is not a food grade plastic) and do it in your most ventilated area at your home.

Okie dokie, let's start the tutorial ^_^

What you'll need:
1. A sheet of shrinkable plastic
2. The drawing you want to shrink it
3. Oil based marker
4. Coloured pencils
5. Sharp scissor/cutter
6. A heat gun
7. A punch hole


Gather all the tools needed

Quick brief about Ranger Shrink Plastic. I bought online from Singapore scrapbooking supplies website called http://www.mapletreehouse.com/ 1 packet consist of 5 sheets with the cost of S$7.88. For me, this is the best shrink plastic compare to Daiso. Daiso's too thick, very hard to cut with scissor. 

I follow the instruction written on back of the packet, that you need to sand the sheet with 320-400 grit sand paper (totally optional). I sanded it in cross hatch direction, cause i am going to coloured it with pencil colours. And the sheet need the teeth to grip/capture the colours from pencils. Oups, i already trace my drawing into the sheets before taking pictures ^_^

This is the picture that i want to shrink it. It's from my hand drawing.

Trace the pictures as many as you want using oil based markers or sharpies, acrylic paint, and even coloured pencils. When i read the tutorials from the internet, many advised that avoid using water based marker, as the colours will run when heated. My oil based markers is from Zebra. Got them from Popular bookstore.

Colour, colour and colour. I like to colour them on top of a white sheet of paper, so you can see the colour more clear/easy. You can always comeback to outline the edges.

Cut into 2 and you want to punch a hole before heating. 

Carefully and patiently cut into your desire shapes. You may use cutter, die cut machine or just scissor. But pay attention when cutting curve. You need to slowly in order not to break/crack the plastic. I have done that many times :( 

Let's heat them. First time i do, i never thought about using baking tray. I just heat it on the floor and the plastic flew all over the place. I also use a wooden chopstick, cause it will become very hot and you do not want to touch it, so use a chopstick.

In about seconds the plastic will start to crumple. Don't panic or scared (first time i was panic), it will start to open, shrink and flat. Sorry, no photo, cause both hands were busy. 1 holding heat gun, the other hand hold chopstick. Once the plastic lay flat, the shrink will stop.

Again, do not touch the plastic cause still hot. I am using cotton glove or napkins to pick up and quickly flatten with ruler or heavy book to make the piece nicely flat.

You will do the same with the other piece. After cool, the pieces will become rigid, hard, and flat. The colours also darken.

The pieces shrunk about 1/4 of the original size. Now you can attach a jump ring and make keychains, earrings, handphone charms, pendant, etc. Oh almost forget, it would be better if you spray or brush small amount of acrylic sealant to the charms, to protect the colours.

The charms i made using Daiso's. The red colour that looked like a teardrop was made by my friend, Yanni, who stayed at my house during her transit to Lijiang. Also, there is 1 moustache, but the piece broke into 2 already :(

Haha, found this picture from my handphone. She helped me coloured the moustache.

After that we go crazy in posing with the moustache :))

Hello Mario!!!!
Borrow hubby's glasses ^_^

 I made this piece a night before making the lion charms. I was using oil based markers to colour. After heated, the colours look like glass deco.

Okay, that's the end of my tutorial. My pieces not always come in perfect shapes. I failed many times before. Most often the piece crumpled into 1 piece @_@ but don't worry, keep on practice ;)

Please if you have any questions, comments or suggestions, just leave them in comment box below.

See you on my next post!!

Let's Make Them.
[ Read More ]